
Trojan.Viknok Activity 3
Trojan.Viknok Activity 3 is severely nasty and stubborn computer threat that causes various system corruptions and put your personal files, data and information at risk. After invading your PC, Trojan.Viknok Activity 3 generates lots of junk files and executes redundant tasks underground to strikingly slow down system running and cause unusual errors, system crash and BSOD. Besides, Trojan.Viknok Activity 3 alters, replaces or deletes files in your Registry, making your PC be filled with security bugs and exploits. In such risky situation, other PC threats can invade your PC easily and cyber criminal could access your PC to encrypt your personal files and steal your sensitive information.Trojan.Viknok Activity 3 infects a PC when people visit hacked websites which contain exploits codes made to spread malware. Moreover, when people open attachments of spam email, Trojan.Viknok Activity 3 could infiltrate their system as well. Antivirus software can detect the incursion of this threat, but unfortunately, they are not able to get rid of it completely. To cope with such stubborn virus, it’s best to apply manual removal method to locate and remove all infected files hiding on your PC. If you have trouble to remove Trojan.Viknok Activity 3, please complete the steps below, you will be able to terminate this nasty threat quickly and safely. If you have any problem during the removal process, please get MiTechMate Online Tech Support here:

Why Does Antivirus Program Cannot Remove Trojan.Viknok Activity 3?
Trojan.Viknok Activity 3 is belong to one of the most stubborn virus made with advanced technology, it can deeply root in your system without restriction from your firewall or antispyware. Besides, virus makers are familiar the security rules and methods that a antivirus uses, therefore they can create some virus like Trojan.Viknok Activity 3 with codes able to bypass antivirus detection and removal. To get rid of such a kind of tricky virus, manual removal is the most effective way. If you are experiencing a hard time on removing Trojan.Viknok Activity 3, complete all stets below and you will get your healthy PC back.Get Rid of Trojan.Viknok Activity 3 step by step now
(Please carefully read the notes before you start to remove any file :This guide is based on the first version of Trojan.Viknok Activity 3, but this infection keeps adding its features and updating its codes, files and locations, thus you may not be able to find out all its related files listed below. It requires expert skills and experience to identify all the files of Trojan.Viknok Activity 3 infection, if you are not familiar with it, do not risk to delete any file by yourself, since you may disable your PC for deleting wrong files which are crucial for your system. This guide is just for reference, we do not promise it will work for all the victims of different PCs in varied situations and conditions. Any problem and consequence incurred by your mistake should be borne by yourself.)
Step1: Stop Trojan.Viknok Activity 3 processes in the Windows Task Manager by Pressing Ctrl+Alt+Del keys together
random.exe
On Windows XP
- Press Ctrl+Alt+Del keys together to open Windows Task Manager ;
- Under the Processes tab, right-click on the processes related with the virus and click End Process

On Windows 7 / Windows Vista
- Right-click on Task Bar and click click Task Manager;
- Under the Processes tab, right-click on the processes related with the virus and click End Process


On Windows 8 / 8.1
- Right-click on Task Bar and click click Task Manager;
- Under the Processes tab, right-click on the processes related with the virus and click End Process

Step2: Show all hidden files: On Windows XP
- Close all programs so that you are at your desktop.
- Click on the Start button. This is the small round button with the Windows flag in the lower left corner.
- Click on the Control Panel menu option.
- When the control panel opens click on the Appearance and Personalization link.
- Under the Folder Options category, click on Show Hidden Files or Folders.
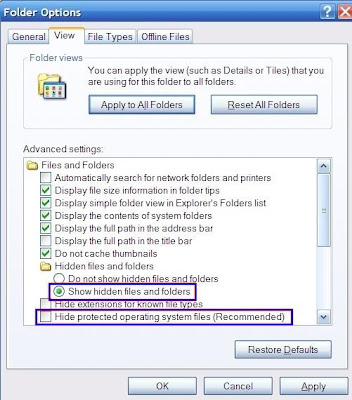
- Under the Hidden files and folders section, select the radio button labeled Show hidden files, folders, or drives.
- Remove the checkmark from the checkbox labeled Hide extensions for known file types.
- Remove the checkmark from the checkbox labeled Hide protected operating system files (Recommended).
- Press the Apply button and then the OK button.
On Windows 7 / Vista
- Click and open Libraries
- Under the Folder Options category of Tools , click on Show Hidden Files or Folders.
- Under the Hidden files and folders section, select the radio button labeled Show hidden files, folders, or drives.
- Remove the checkmark from the checkbox labeled Hide extensions for known file types.
- Remove the checkmark from the checkbox labeled Hide protected operating system files (Recommended).
- Press the Apply button and then the OK button.


On Windows 8 /8.1
- Click on Windows Explorer ;
- Click on View tab;
- Check the "Hidden Items" box

Step3: Erase Trojan.Viknok Activity 3 Virus associated files
%AppData%\Protector-[random 4 characters].exe
%System%\setup.ini
%SystemRoot%\system32\%Temp%\
%AllUsersProfile%\Application Data\.dll%UserProfile%\Start Menu\Programs\random.lnk t
Step 4: Uninstall Trojan.Viknok Activity 3 associated programs or suspicious program from Control Panel:
(Free software installed on or near the date that the virus appeared)
Windows 8 users
1. Press Windows key and I key together on your keyboard to open the Settings Charm Bar:

2. Click Control Panel on Settings Charm Bar and then click Uninstall a program in Control Panel:


3. Find out and Uninstall associated programs from the Programs and Features list:

Windows Vista and 7 users
1. Click Start button and then click Control Panel on the Start Menu:

2. Click Uninstall a program in Control Panel:
3. Find out and Uninstall associated programs from the Programs and Features list:
Windows XP users
1. Click Start button >> click Settings on Start Menu >> Click Control Panel

2. Click Add or Remove Programs in Control Panel and remove associated programs:


Step 5: Terminate these Registry Entries created by Trojan.Viknok Activity 3.

 HKEY_CURRENT_USER\Software\Microsoft\Windows\CurrentVersion\InternetSettings “CertificateRevocation”=0
HKEY_CURRENT_USER\Software\Microsoft\Windows\CurrentVersion\Policies\System “DisableTaskMgr” = 1
HKEY_LOCAL_MACHINE\SOFTWARE\Microsoft\Windows\CurrentVersion\policies\system “ConsentPromptBehaviorAdmin” = 0
HKEY_CURRENT_USER\Software\Microsoft\Windows\CurrentVersion\Run: [avsdsvc] %CommonAppData%\ifdstore\security_defender.exe /min
HKEY_LOCAL_MACHINE\SOFTWARE\Microsoft\Windows\CurrentVersion\policies\system “ConsentPromptBehaviorUser” = 0
HKEY_LOCAL_MACHINE\SOFTWARE\Microsoft\Windows\CurrentVersion\Run "random "
Video Guide about How to Remove Registry Entries of Trojan Virus
I am not good at fixing PC, is it risky for me to remove Trojan.Viknok Activity 3 manually?
If you are not a computer expert, it will be very risky to complete the Trojan.Viknok Activity 3 manual removal process. You have to assure that you are equipped with expert-level knowledge and skills on PC before you do anything on the infected system. If you are not experienced enough on manually removing a virus, please get MiTechMate Online PC Support to help you.
No comments:
Post a Comment
Note: Only a member of this blog may post a comment.