
Ihavenet.com Browser Redirect – How to Block
Ihavenet.com is a tricky redirect virus and adware created to gain Internet traffic and promote sales of unknown third party’s products. Once Ihavenet.com infects your PC, it installs adware and spyware on all your browsers, then it can help its sponsors collect your search engine keywords and embed relative ads to bombard you. Ihavenet.com will hijack all your search engines including Google, Yahoo and Bing, whenever you type in a search, all the links shown on your search results will be redirected to ihavenet.com and many other advertising sites. Your homepage will also be set as Ihavenet.com, and when you open a new website, there will also be a new tab coming up with URL http://ihavenet.com/.
More severely, Ihavenet.com will download various malware from remote server, then your PC performance will be degraded strikingly. The malware will disable your legit programs including antispyware and firewall, thus Ihavenet.com could keep harassing you without any hindering. To stop Ihavenet.com redirecting your browser, manual removal is the best solution. If you pages are still redirected Ihavenet.com constantly, you are highly recommended to follow the manual removal tips below to get rid of Ihavenet.com hijacker. Take action now!
(Note:If you are not a computer expert, it will be very risky to complete the Ihavenet.com manual removal process. You have to assure that you are equipped with expert-level knowledge and skills on PC before you do anything on the infected system. If you are not experienced enough on manually removing a virus, please get Online PC Expert to help you:)

How does Ihavenet.com virus infect my computer?
Ihavenet.com usually infects a Windows system when the user download free software from unknown third party websites, which always attempts to install malware on your PC and scam you. Please keep in mind that, freeware is always used by cyber criminal to spread virus, you’d better not to download any free programs from any site unless it is a website with good reputation.Besides, when people receive spam email and junk email, Ihavenet.com could also sneak into user’s system, since malicious code has been embedded on attachments. So next time, when you receive suspicious email, you’d better do not open its attachments unless it is something you are expecting.
Other viruses may be downloaded by Ihavenet.com
browser defender, Search.conduit.com, Jvl.libpack.net, Searchnu.com/406, News.net, Instant Savings App, V9.com, Start.iminent.com, Http://search.b1.org, cloud-connect.net, Websearch.searchesplace.info and WebCake 3.00
Why Did My Antivirus Program Fail to Remove ihavenet.com?
ihavenet.com is belong to one of the most stubborn virus made with advanced technology, it can deeply root in your system without restriction from your firewall or antispyware. Besides, virus makers are familiar the security rules and methods that a antivirus uses, therefore they can create some virus like ihavenet.com with codes able to bypass antivirus detection and removal. To get rid of such a kind of tricky virus, manual removal is the most effective way. If you are experiencing a hard time on removing ihavenet.com, complete all stets below and you will get your healthy PC back.Get Rid of Ihavenet.com step by step now
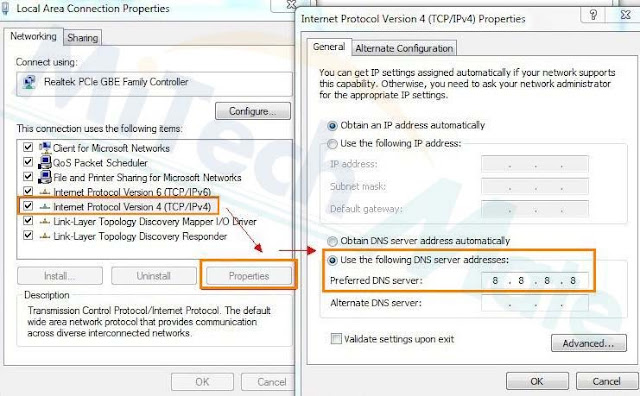
Step1: Set Your DNS as Google’s public DNS (8.8.8.8):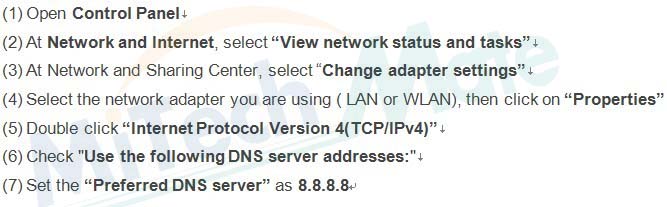
Step2: Stop Ihavenet.com processes in the Windows Task Manager by Pressing Ctrl+Alt+Del keys together
random.exe

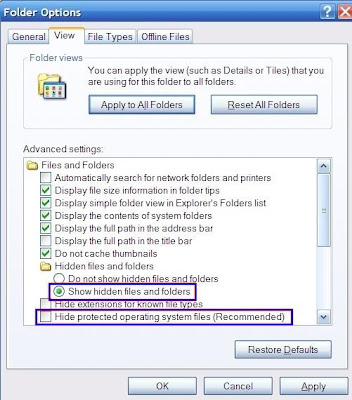
Step3: Show all hidden files:
- Close all programs so that you are at your desktop.
- Click on the Start button. This is the small round button with the Windows flag in the lower left corner.
- Click on the Control Panel menu option.
- When the control panel opens click on the Appearance and Personalization link.
- Under the Folder Options category, click on Show Hidden Files or Folders.
- Under the Hidden files and folders section select the radio button labeled Show hidden files, folders, or drives.
- Remove the checkmark from the checkbox labeled Hide extensions for known file types.
- Remove the checkmark from the checkbox labeled Hide protected operating system files (Recommended).
- Press the Apply button and then the OK button.
Step4: Find out and delete all Ihavenet.com Virus associated files
%UserProfile%\Start Menu\Programs\ Ihavenet.com \
%AppData%[trojan name]toolbarstats.dat
%AppData%[trojan name]toolbaruninstallIE.dat
Step5: Locate and delete these Registry Entries created by Ihavenet.com.

HKEY_CURRENT_USER\Software\Microsoft\Internet Explorer\Download “CheckExeSignatures” = ‘no’
HKEY_CURRENT_USER\Software\Microsoft\Windows\CurrentVersion\Policies\Attachments “SaveZoneInformation” = ’1′
HKEY_LOCAL_MACHINE\SOFTWARE\Microsoft\Windows\CurrentVersion\policies\system “DisableTaskMgr” = ’1′
HKEY_CURRENT_USER\Software\Microsoft\Internet Explorer\Main “Use FormSuggest” = ‘yes’
HKEY_CURRENT_USER\Software\Microsoft\Windows\CurrentVersion\Policies\System “DisableTaskMgr” = 0
HKEY_LOCAL_MACHINE\SOFTWARE\Microsoft\Windows\CurrentVersion\policies\system “ConsentPromptBehaviorAdmin” = 0
HKEY_LOCAL_MACHINE\SOFTWARE\Microsoft\Windows\CurrentVersion\policies\system “ConsentPromptBehaviorUser” = 0
HKEY_CURRENT_USER\Software\Microsoft\Installer\Products\random
Youtube Guide on How to Manually Remove Registry Entries of Hijacker like Ihavenet.com
Important Notes for PC Users without Enough Virus Removal Skills and Experience
You should not risk to ruin the whole PC if you are not good at handing virus manually. The process of manually removing ihavenet.com Virus is highly risky. You have to assure that you are equipped with expert-level knowledge and skills on PC before you do anything on the infected system. If you cannot get a PC Expert to help you, please feel free to let MiTechMate Professional PC Support help you solve it.

No comments:
Post a Comment
Note: Only a member of this blog may post a comment.